My first short

I finished my first short film this year. It’s about a kid – Jonny – who breaks his skateboard. He meets some guys who play his grandpa’s old fiddle tunes, and he figures he might be able to busk to buy a new board. But is that what he really wants?
It’s called Plaansh a Roo. Developed in the imagineNative + Netflix Shorts Lab, and funded by Canada Council for the Arts, the Indigenous Screen Office, and Ontario Arts Council, it’s coming to a film festival near you.
Carnival Scoreboard
Working draft
Carnivals are all fun and games, but it also helps to win something. In this tutorial, we’re going to take the scores we generated from our Ticket Target Practice game, and display them in a Vue-based frontend, backed by a Serverless Function.
Prerequisites
- a completed Ticket Target Practice app with some high scores
- HubSpot CLI, v2.0+
Getting setup
First, make sure you’ve got the latest version of the CLI. To create a Vue app with hs create, you’ll need at least version 2.0.
hs --version
# 2.1.0
From the root folder we set up in the Deal Fishing tutorial, we’ll create a new folder for our scoreboard, where we’ll do our work for this tutorial.
mkdir scoreboard
cd scoreboard
Create template and add module
Let’s start by making our template, which will let us easily make a page that our Vue app will live in. First, let’s use the CLI to create the template:
hs create template scoreboard-page
Now we can open up the resulting scoreboard-page.html file, and replace its contents with the following:
<!--
    templateType: page
    label: Scoreboard template
    isAvailableForNewContent: true
-->
<!doctype html>
<html>
  <head>
    <meta charset="utf-8">
    <title>{{ content.html_title }}</title>
    <meta name="description" content="{{ content.meta_description }}">
    {{ standard_header_includes }}
  </head>
  <body>
    {% module "cms_vue_boilerplate" path="./cms-vue-boilerplate/modules/app" label="CMS Vue Boilerplate" %}
    {{ standard_footer_includes }}
  </body>
</html>
It’s a pretty straightforward template. In the template-annotation, we set the label to Scoreboard template so it’s easy to search for. Then in the body, we include the module we’re going to create containing our Vue app – the cms_vue_boilerplate module. The path is absolute – it begins from the home directory of our Design Manager.
Create a page from the template
With the template created, we’re now going to make a page from it like we did in our previous tutorials, which we’ll use to develop the app and verify it works. In the top bar of HubSpot, go to Marketing > Website > Website Pages, and press Create in the top right corner, then select Website page.
Click “All of your templates”.
With the search bar in the top right, let’s search for “Ticket Target Practice template” and select that template. Finally, give it a name – maybe Ticket Target Practice game. Click Create Page, then we’re nearly done.
But it won’t let us press publish yet. You’ll need to head to the Settings bar and do two things there. First, add a Page Title. Then copy the link to the page. Finally, press Publish, and open up your brand new page:
This is the page and URL we’ll use from now on to try the game out as we develop it. Keep it handy! With that page published, we’re ready to develop our Vue app.
Creating a Vue app with the CLI
Using the CLI, we’ll use a built-in command for creating a Vue app with a build step. If you’d like to create a Vue app and deploy it to HubSpot without a build step, check out the docs for instructions on how to use it via CDN, and some discussion about when that may be helpful.
In our scoreboard folder, we’ll create a Vue app from a boilerplate template, using the CLI.
hs create vue-app
cd vue-app
For reference, you can see how to get started with the HubSpot Vue boilerplate app here. Unlike our previous Phaser.js-based games, the Vue boilerplate includes some npm and yarn commands that automatically build and deploy it to HubSpot.
Now that we’re in vue-app, we’ll install the necessary dependencies, add the axios HTTP package, and finally start our app up and see it show up in our Design Manager.
yarn install
yarn add axios
yarn start
With yarn start, you should see a lot of output from the build logs, ending with an indication that new files have been uploaded:
...
<i> [HubSpotAutoUploadPlugin] Uploaded cms-vue-boilerplate/assets/vue.svg
<i> [HubSpotAutoUploadPlugin] Uploaded cms-vue-boilerplate/main.css
<i> [HubSpotAutoUploadPlugin] Uploaded cms-vue-boilerplate/modules/app.module/module.html
<i> [HubSpotAutoUploadPlugin] Uploaded cms-vue-boilerplate/modules/app.module/fields.json
<i> [HubSpotAutoUploadPlugin] Uploaded cms-vue-boilerplate/assets/sprocket.svg
<i> [HubSpotAutoUploadPlugin] Uploaded cms-vue-boilerplate/modules/app.module/meta.json
<i> [HubSpotAutoUploadPlugin] Uploaded cms-vue-boilerplate/main.js
Leave yarn start running, and we’ll begin developing our app. Let’s walk through it before diving in. The code we’ll be working on all lives in /src. There, we’ll open up App.vue. Replace the code there with this <template>:
<template>
  <div class="cms-vue-boilerplate-container">
    <p>Welcome to…</p>
    <h1>The HubSpot Carnival Scoreboard!</h1>
    <div class="scoreboard">
      <table>
        <thead>
          <tr>
            <th>rank</th>
            <th>name</th>
            <th>score</th>
          </tr>
        </thead>
        <tbody>
          <tr v-if="error">
            <td></td>
            <td>Error: {{ error }}</td>
            <td></td>
          </tr>
          <tr v-else-if="loading">
            <td></td>
            <td>Loading…</td>
            <td></td>
          </tr>
          <tr v-else v-for="(item, item_index) in sortedScores">
            <td>{{ item_index + 1 }}</td>
            <td>{{ item.name }}</td>
            <td>{{ item.score }}</td>
          </tr>
        </tbody>
      </table>
    </div>
  </div>
</template>
We’ll use a table to show what’s happening. If loading is true, we’ll show a loading message in the table. Otherwise, we’ll create a row for each score object in sortedScores, showing their rank, name, and score.
Next, let’s create the script. Directly below the end of the above code, add the following:
<script>
import axios from 'axios';

export default {
  name: 'App',
  props: ['moduleData'],
  data: function() {
    return {
      highScores: null,
      loading: true
    };
  },
  mounted: function() {
    axios
      .get('_hcms/api/high_scores')
      .then(response => {
        var data = response.data;

        // parse into dictionaries
        var newScores = [];

        data.forEach((item, i) => {
          var scoreObject = JSON.parse(item.properties.subject);
          if ("name" in scoreObject && "score" in scoreObject) {
            newScores.push(scoreObject);
          }
        });

        this.highScores = newScores;
        this.loading = false;
      });
  },
  computed: {
  sortedScores: function() {
    if (this.highScores != null) {
      function compare(a, b) {
          if (a.score > b.score) return -1;
          if (b.score > a.score) return 1;
        }
        return this.highScores.sort(compare);
      }
    }
  },
  created: function() {
    // eslint-disable-next-line no-console
    console.log(
      'all of your data typically accessed via the "module" keyword in HubL is available as JSON here!',
      this.moduleData,
    );
  },
};
</script>
If you’re new to Vue, it might help to know about its reactive architecture. That means that any time that data gets updated, it’ll automatically refresh any fields in the app that rely on that data.
When the mounted() lifecycle function is called, we’re going to create an HTTP call to a serverless function that we’ll create, and use it to set this.highScores, which we’ve added in our data object. Then, we’ll use sortedScores() to sort those scores from the highest score to the lowest.
Because mounted() gets called after the app is loaded and displayed, we’ll also have to handle this loading state. That’s why we set highScores: null and loading: true to begin with. When we get an acceptable response from our serverless function, we’ll override both those values, and Vue will automatically reload the data on screen.
Finally, as a reminder, we can access any of our module data that we’d usually use in our HubL templates via this.moduleData.
Before moving on to see how it looks, let’s add the styles to the end of the same file:
<style lang="scss">

h1 {
  margin-top: -0.5em;
  font-family: 'Rye', cursive;
}

.scoreboard {
  font-family: 'Press Start 2P', cursive;
  width: 50%;

  table {
    margin: auto;
    background: #212121;
    border-color: white;
    border-style: dashed;
    padding-bottom: 1em;

    th {
      padding: 1em;
      color: red;
    }

    td {
      padding: 0 1em;
    }
  }
}

.cms-vue-boilerplate-container {
  text-align: center;
  background-color: #282c34;
  display: flex;
  flex-direction: column;
  align-items: center;
  justify-content: center;
  font-size: calc(10px + 2vmin);
  color: white;
  padding: 1rem 0 1rem 0;
}

</style>
That’s it for now! If you save and refresh your scoreboard page, you should see… well, not a lot. Because we haven’t yet created our serverless function, we just get a 404, and Loading... stays on the screen forever.
It’s time to dive into the serverside code.
Create high_scores serverless function
Our serverless function will have to find the appropriate pipeline for the Ticket Target Practice game, then return only the high score tickets from that pipeline’s second stage.
Let’s get started by creating the function, again in our scoreboard folder:
hs create function high-scores
? Name of the folder where your function will be created: high-scores
? Name of the JavaScript file for your function: highscore.js
? Select the HTTP method for the endpoint: GET
? Path portion of the URL created for the function: high_scores
Created "~/Developer/hubspot/scoreboard/high-scores/high-scores.functions"
Created "~/Developer/hubspot/scoreboard/high-scores/high-scores.functions/highscore.js"
Created "~/Developer/hubspot/scoreboard/high-scores/high-scores.functions/serverless.json"
[SUCCESS] A function for the endpoint "/_hcms/api/high_scores" has been created. Upload "high-scores.functions" to try it out
Now let’s begin to watch the folder, so that your changes are automatically made and pushed live:
hs watch high-scores high-scores --initial-upload
Alright, now we can get things going. First, in serverless.json, we have to add "hubapikey" to our secrets key. Again, you’ll have to have set this up in our previous tutorials – head to the Deal Fishing tutorial to see how it’s done.
{
  ...
  "secrets": ["hubapikey"],
  ...
}
Then, let’s open up highscore.js, where we’ll create a request for the pipelines on our account, and then get the tickets on its second stage before responding with them:
const hubspot = require('@hubspot/api-client');
const hubspotClient = new hubspot.Client({ apiKey: process.env.hubapikey});

// This function is executed when a request is made to the endpoint associated with this file in the serverless.json file
exports.main = ({ accountId }, sendResponse) => {
  const defaultParams = {
    hapikey: process.env.hubapikey
  };

  // call the HubSpot Pipelines API using the api-client
  hubspotClient.crm.pipelines.pipelinesApi.getAll('tickets', archived=false)
    .then(results => {
      // Handle success
      pipeline = results.body.results.find(obj => obj.label === "Ticket Target Practice Game");

      if (pipeline == null) {
        sendResponse({ body: "No pipeline found", statusCode: 400});
        return
      }

      // now let's search for the high score tickets on that pipeline
      const publicObjectSearchRequest = {
        filterGroups: [
          {
            filters:
            [
              {value: pipeline.id, propertyName: 'hs_pipeline', operator: 'EQ'},
              {value: pipeline.stages[1].id, propertyName: 'hs_pipeline_stage', operator: 'EQ'}
            ]
          }
        ],
        sorts: [
          {
            "propertyName": "createdate",
            "direction": "DESCENDING"
          }
        ],
        properties: ['id', 'subject'],
        limit: 100,
      };

      hubspotClient.crm.tickets.searchApi.doSearch(publicObjectSearchRequest)
        .then(results => {
          // success!
          tickets = results.body.results;
          sendResponse({ body: tickets });
        }).catch(err => {
          console.log(error.message);

          sendResponse({ body: { error: "The search for tickets failed: " + error.message }, statusCode: 500 });
        });
    })
    .catch(err => {
      // Handle error
      console.log(error.message);

      sendResponse({ body: { error: "Getting pipelines failed: " + error.message }, statusCode: 500 });
    });
};
At the top, we create a request to the pipelines.pipelinesApi.getAll endpoint, which will return all our pipelines on the account. We handle the successful response in .then(), where we look for the pipeline object called "Ticket Target Practice Game". If it’s not there, we’ll return a 400.
If the pipeline is there, we can then craft a search for tickets that are in the appropriate stage for high scores, which we do using publicObjectSearchRequest. We fire that off to the tickets.searchApi.doSearch endpoint; if that returns something, we’ll craft a sendResponse() call to return the tickets to our scoreboard app, which will then handle displaying and ordering the data.
With hs watch running, the endpoint should be ready to go. And because our Vue app lives on the same domain as our _hcms/api/high_scores endpoint, we don’t have to update anything in the Vue app’s call to the endpoint – we’re already calling its relative path. Just refresh, and you should see your scores show up!

Conclusion
That’s it! With these three Carnival tutorials, you’ve seen how quick and effective HubSpot’s developer tools are at building useful (or sometimes just fun) webapps. Maybe you’ve even picked up a couple new skills along the way.
Next, it’s up to you. Maybe you’d like to be able to customize the player name with a custom form? Or do you want to create your own Vue app or Phaser game backed by the HubSpot API? Let us know what you build using the #hubspotcarnival and tagging @hubspot, wherever hashtags can be used.
Ticket Target Practice
Working draft
In our second tutorial for the HubSpot Carnival, we’re going to make a simple target shooting game that tracks your score and saves your name and high score – with the help of HubSpot’s Serverless Functions. At the end of this tutorial, you’ll have a game deployed on HubSpot with persistent scores backed by the Ticket and Pipeline APIs.
Prerequisites
- HubSpot CLI, v2.0+
- The game assets, downloadable here // TODO
How it works
There are three pieces we’ll be working on:
- The frontend Phaser.js game.
- The
start_gameserverless function, which configures the game. - The
update_gameserverless function, which keeps track of scores and saves your high score when it’s game over.
When you start the game, we get the configuration for the targets as well as some other important info from the start_game function. Then, every time you hit a target, we’ll track that in the frontend game, and then communicate your totals to update_game to get a new level configuration, as well as to save that level’s score using a ticket. Finally, we post game_over to the same endpoint to save the high score.
The game
Initial setup
First, head to the root folder where you had your CLI setup from the last tutorial. We’ll make a new ticket-target-practice folder in there, then do all our work inside it.
First, we’ll create the folder, and download and unzip our assets there, before uploading them.
mkdir ticket-target-practice
cd ticket-target-practice
open .
hs create module game
? What should the module label be? Ticket Target Practice
? What types of content will this module be used in? Page
? Is this a global module? No
Creating ~/Developer/hubspot/ticket-target-practice/game.module
Creating module at ~/Developer/hubspot/ticket-target-practice/game.module
Then we’ll make a template:
hs create template ticket-target-practice
hs watch . target-practice-tutorial --initial-upload
Now we’ve got a module called game.module, which is also a folder that contains all our module files. We’ve also created a template called ticket-target-practice, which we’ll use to create nice page where we can see our work. Finally, with hs watch we’re also getting the CLI to watch everything that happens in this folder and upload our changes as we make them, so that it’ll all automatically show up.
Setting up the template
With our initial module and template set up, we’re going to head to the Design Manager to get the Template up and running. First, find your target-practice-tutorial folder in the Design Manager:

Now, we’ll open up the game module in there, and scroll down on the right sidebar until we can copy the “Usage snippet.””

Now, head to your template file back in your text editor, or open it up in the Design Manager (though the changes you make won’t show up back on your computer). Replace the {% module %} tag in the first line of <body> with your own:
<!--
    templateType: page
    label: Ticket Target Practice template
    isAvailableForNewContent: true
-->
<!doctype html>
<html>
  <head>
    <meta charset="utf-8">
    <title>{{ content.html_title }}</title>
    <meta name="description" content="{{ content.meta_description }}">
    {{ standard_header_includes }}
  </head>
  <body>
    {% module "module_YOURMODULEID" path="/ticket-target-practice/ticket-target-practice", label="ticket-target-practice" %}
    {{ standard_footer_includes }}
  </body>
</html>
Finally, we’ll create a page based on the template, where we’ll do the rest of our game and function development. In the top bar of HubSpot, go to Marketing > Website > Website Pages, and press Create in the top right corner, then select Website page.
Click “All of your templates”.
With the search bar in the top right, let’s search for “Ticket Target Practice template” and select that template. Finally, give it a name – maybe Ticket Target Practice game. Click Create Page, then we’re nearly done.
But it won’t let us press publish yet. You’ll need to head to the Settings bar and do two things there. First, add a Page Title. Then copy the link to the page. Finally, press Publish, and open up your brand new page:
This is the page and URL we’ll use from now on to try the game out as we develop it. But we’re also going to copy the subdomain part of the URL so that we can get the game to talk to our Serverless Functions:
http://yoursandboxusername-1234567.hs-sites.com
In this case, you’ll copy yoursandboxusername-1234567. That’s all we need to be able to call our Serverless Function from within the app.
Now, we’re ready to get the game going!
The Game
Setting the module up
Compared to our last game, we’ve got some very straightforward work on the game itself. But before we start on that, we’ve got a couple changes to make to the other files in the module. To begin, let’s head to module.html and make some changes there:
<!-- module html  -->
{{ module.text }}
{{ require_js("https://cdn.jsdelivr.net/npm/phaser@3.24.1/dist/phaser.min.js", "head")}}
And then in module.css, let’s import a cool Western-style font:
@import url('https://fonts.googleapis.com/css2?family=Rye&display=swap');

h1 {
  font-family: 'Rye', cursive;
}
At this point, you can refresh the game page and you should see a "Hello, world!" header show up.
Uploading the assets
Before getting to work on the game itself, let’s upload our /assets folder to make the necessary game assets available to our Phaser.js game.
Creating the game
Open the module.js file. That’s where our module’s JavaScript lives, and where our client-side game code will live.
First, let’s set up the variables and the preload() function, which gets called on startup.
var config = {
    type: Phaser.AUTO,
    width: 800,
    height: 600,
    physics: {
      default: 'arcade',
      arcade: {
        gravity: { y: 0 },
        debug: true
      }
    },
    scene: {
        preload: preload,
        create: create,
    }
};

var playerName = "ABC"; # Insert your initials here

var level = 1;
var targetsHit = 0;

var pipeline; # for keeping track of the game's ticket pipeline that start_game will return

var movementTween;
var text;

var game = new Phaser.Game(config);

function preload ()
{
  this.load.image('target', 'https://f.hubspotusercontent20.net/hubfs/REPLACE_ME/assets/target.png');
  this.load.image('background', 'https://f.hubspotusercontent20.net/hubfs/REPLACE_ME/assets/background.png');
}
Pretty straightforward. Make sure you add your initials in the playerName variable, and replace the REPLACE_ME text with your account’s unique ID, as you would’ve found in the previous tutorial.
Finally, in preload(), we just load a couple things. You also might have noticed that we don’t have a update() function included in our config! We actually don’t need it this time around, and can get all our work done with callbacks and events.
Now, we’re going to add our create() function. That’s where we’re going to get the configuration details for our first level, by calling a serverless function. Paste the following at the end of module.js:
function create ()
{
  pointer = this.input.setDefaultCursor('url(https://f.hubspotusercontent20.net/hubfs/REPLACE_ME/assets/cursor.cur), pointer');

  var background = this.add.image(800, 600, 'background');
  background.setOrigin(1.0, 1.0);

  text = this.add.text(400, 300, "Get Ready…", { align: 'center', fontFamily: 'Rye' });
  text.setOrigin(0.5);

  // start the game with the start_game endpoint
  fetch("//yoursandboxusername-1234567.hs-sites.com/_hcms/api/start_game").then(res => {
    return res.json()
  }).then(data => {
    console.log(data);

    pipeline = data.pipeline;

    targets = this.physics.add.group();

    text.destroy();
    createTargets(1, data.config, this);
  }).catch(function(error) {
    console.log(error);
  });
}
First things first: replace the REPLACE_ME text again. Then go and grab the subdomain you saved above from your page’s URL, and paste it in the fetch URL, replacing yoursandboxusername-1234567.
Now, let’s walk through this code. It creates a pointer for targeting, which it loads from a URL. Then, we add a background and text to make it a little more interesting of a game. Then, we kick off a request to our /start_game endpoint, which is backed by a serverless function. With the results of that call, we set our pipeline var, and then create a group called targets that will contain all of our target game objects.
With the group made, we can go ahead and create the targets you’ll be shooting with the config dictionary the call returned as well.
That brings us to createTargets()! Add the following code to your module.js file:
function createTargets (level, config, scene)
{
  targets.createMultiple(config); # anywhere from three to five targets, depending on what the config contains
  var speed = 10000 / level; # as the level increases, the speed does too

  targets.children.iterate(function (child) {
    // loop over each target:
    child.setInteractive();

    child.on('pointerdown', function(event) {
      child.setTint(0xff0000);

      // show the animation for a second, then disable:
      var flipDownTween = scene.tweens.add({
        targets: child,
        scaleY: 0,
        duration: 1500,
        ease: "Bounce",
        onStart: function() {
          targetsHit += 1;
          child.disableBody(false, false);
        },
        onComplete: function() {
          if (typeof child.scene != 'undefined') {
            child.disableBody(true, true);
          }

          if (targets.countActive(true) === 0) {
            // set up the new ones
            console.log("You shot them all!");

            targets.clear(true, true);
            completeLevel(false, targetsHit, level, scene);
          }
        }
      })
    });
  });

  if (movementTween) {
    scene.tweens.remove(movementTween);
  }

  movementTween = scene.tweens.add({
    targets: targets.getChildren(),
    x: '+=500',
    duration: speed,
    yoyo: true,
    repeat: 2,
    ease: 'Linear',
    onComplete: function() {
      if (targetsHit === 0) {
        // game over!
        console.log("You missed all three!");
        targets.clear(true, true);
        completeLevel(true, 0, level, scene);
      } else if (targets.countActive(true) > 0 ) {
        console.log("You missed " + targets.countActive(true) + " targets!");

        targets.clear(true, true);
        // set up new ones
        completeLevel(false, targetsHit, level, scene);
      }
    }
  });
}
At a high level, there are three things happening: we create the targets in bulk, using targets.createMultiple(). Then we configure those targets and add a tween to them that animates them down if you press on one. Finally, we create another tween – the movementTween – to animate all the targets from side to side, so that it’s a bit harder to hit them.
If you at least one target, you can proceed to the next level. But if you miss them all, it’s game over. We keep track of which targets are hit by disabling them with child.disableBody() in the onStart() block of the first tween; we also increment targetsHit there, to help us track the score.
Then, in the movementTween, we just verify how many targets were left over. If targetsHit is zero, that means you missed everything and we pass gameOver=true to completeLevel(). If there’s still one active target, we pass the same thing we do to completeLevel() as in flipDownTween.onComplete(), because the game should continue.
There’s one final piece to the frontend: the completeLevel() function. Here, we’ll call the /update_game endpoint to get a new config, as well as to make sure our score is save. Let’s add this function at the end.
function completeLevel(gameOver, hitTargets, level, scene)
{
  console.log("Ending level " + level);
  text.destroy();

  if (gameOver === true) {
    // you missed all three. Post your name and get a final score back.
    fetch("//yoursandboxusername-1234567.hs-sites.com/_hcms/api/update_game", {
      method: "POST",
      headers: {
        'Content-Type': 'application/json'
      },
      body: JSON.stringify(
        {
          game_over: gameOver,
          name: playerName,
          pipeline: pipeline
        })
    }).then(res => {
      return res.json()
    }).then(data => {
      text = scene.add.text(400, 300, data.message + "\nFinal score: " + data.score, { align: 'center', fontFamily: 'Rye' });
      text.setOrigin(0.5);
    });
  } else {
    // it's not game over yet :)
    fetch("//yoursandboxusername-1234567.hs-sites.com/_hcms/api/update_game", {
      method: "POST",
      headers: {
        'Content-Type': 'application/json'
      },
      body: JSON.stringify(
        {
          game_over: gameOver,
          level: level,
          hit_targets: hitTargets,
          pipeline: pipeline
        })
    }).then(res => {
      return res.json()
    }).then(data => {
      console.log(data);
      text = scene.add.text(400, 50, "Level " + (level + 1), { align: 'center', fontFamily: 'Rye' });
      text.setOrigin(0.5);

      // set data for the next level
      level = data.level;
      targetsHit = 0;

      createTargets(level, data.config, scene);
    });
  }
}
Here, we’ve got two branches of logic to pursue: what to POST to update_game if it’s game over, and what to POST if the game should continue. If it’s game over, we just send the player’s name, as well as game_over = true, and the pipeline object that’ll help us save the score. We’ll get a final score back, as well as a message to display.
If the game should continue, we post the level we just finished, and the number of targets we hit so that a score can be tallied for the level - plus the pipeline and the game_over status. The endpoint will return a level and config file to begin our next level with, and once we reset targetsHit to 0, we can call createTargets and get things going again.
That’s it for the client-side game! But if you refresh your page, you’ll notice there’s not a lot actually showing up. To finish everything off, we’ll create our two serverless functions: /start_game and /update_game.
The functions
Initial setup
Head back to your terminal and make sure you’re in the ticket-target-practice folder. We’re going to create the two functions here, using the hs create function from the HubSpot CLI.
hs create function
? Name of the folder where your function will be created: ticket-functions
? Name of the JavaScript file for your function: start.js
? Select the HTTP method for the endpoint: GET
? Path portion of the URL created for the function: start_game
Created "~/Developer/hubspot/ticket-target-practice/ticket-functions.functions"
Created "~/Developer/hubspot/ticket-target-practice/ticket-functions.functions/start.js"
Created "~/Developer/hubspot/ticket-target-practice/ticket-functions.functions/serverless.json"
[SUCCESS] A function for the endpoint "/_hcms/api/start_game" has been created. Upload "ticket-functions.functions" to try it out

hs create function
? Name of the folder where your function will be created: ticket-functions
? Name of the JavaScript file for your function: update.js
? Select the HTTP method for the endpoint: POST
? Path portion of the URL created for the function: update_game
The "~/Developer/hubspot/ticket-target-practice/ticket-functions.functions" path already exists
Created "~/Developer/hubspot/ticket-target-practice/ticket-functions.functions/update.js"
[SUCCESS] A function for the endpoint "/_hcms/api/update_game" has been created. Upload "ticket-functions.functions" to try it out
Neat! Now, in each function’s serverless.json config file, let’s add our HubSpot API key. Note: make sure you’ve added the API key to the CLI already, as we covered in the last tutorial.
{
  ...
  "secrets": ["hubapikey"],
  ...
}
We’ll then fire up hs watch again:
hs watch . target-practice-tutorial --initial-upload
And now we’re ready to work on our two endpoints.
The Ticket API and Pipeline API
Here’s where we get into the fun of the API. We’re going to use tickets to create scores for each level, then sum them up into a score for the game. And we’re going to keep track of those tickets in a custom pipeline, which allows us to create multiple stages to slot tickets into.
Normally, you’d use a pipeline for tracking the stage of a customer service ticket – for example, you’d have a pipeline with stages like “new,” “triaged,” and “in progress.” You move your tickets between those stages, until it hits a stage where it’s marked “done.” And that’s exactly what we’re going to do here, just with two stages: Current Game Hits, and High Scores. The first is for tracking all the targets you hit on each level in your current game; if you start a new game, we’ll have to remove everything in it. The second is where we sum up all the scores in Current Game Hits, then create a new ticket that’ll have the high score and your initials on it.
Let’s get started.
Working on start_game
If it’s the first time you’ve run the game, we’re going to create a pipeline, then return it along with a config. If that pipeline’s already around (which we know because pipelines have a unique label, and we can search for it), we’ll return it and a config that can create the targets, but we will also delete any existing tickets in the first “Current Game Hits” stage, just so that each new game starts from a clean slate.
('@hubspot/api-client');
const hubspotClient = new hubspot.Client({ apiKey: process.env.hubapikey});

exports.main = ({ accountId, body, params }, sendResponse) => {
  console.log('Your HubSpot account ID: %i', accountId);

  // get or create a pipeline for this game
  var pipeline;
  // first, get list of all ticket pipelines from the HubSpot Pipelines API
  hubspotClient.crm.pipelines.pipelinesApi.getAll('tickets', archived=false)
    .then(results => {
      pipeline = results.body.results.find(obj => obj.label === "Ticket Target Practice Game");

      if (typeof pipeline != "undefined") {
        console.log("Pipeline ID found: " + pipeline.id);
        removeOldTickets(pipeline, sendResponse);
      } else {
        console.log("We're gonna have to create it");
        createPipeline(sendResponse);
      }

    })
    .catch(err => {
      throw new Error(err);
    })
};
It’s pretty straightforward: if there’s an existing pipeline called Ticket Target Practice Game that we find when looking through our pipelines, we’re going to call removeOldTickets(). If not, we’ll call createPipeline(). In both cases, we pass along sendResponse so that we can call that after we’ve done all the necessary networking.
Next, we’re going to add createPipeline() and removeOldTickets(), where we communicate with the HubSpot APIs.
function removeOldTickets(pipeline, sendResponse) {
  const publicObjectSearchRequest = {
      filterGroups: [
        {
          filters:
          [
            {value: pipeline.id, propertyName: 'hs_pipeline', operator: 'EQ'},
            {value: pipeline.stages[0].id, propertyName: 'hs_pipeline_stage', operator: 'EQ'}
          ]
        }
      ],
      sorts: ['id'],
      properties: ['id'],
      limit: 100,
  };

  hubspotClient.crm.tickets.searchApi.doSearch(publicObjectSearchRequest)
    .then(results => {
      var ids = [];

      results.body.results.forEach((item, i) => {
        ids.push({id: item.id});
      });

      // now we archive the old tickets using the above ids

      const batchInputSimplePublicObjectId = {
        inputs: ids
      }
      hubspotClient.crm.tickets.batchApi.archive(batchInputSimplePublicObjectId)
        .then(results => {
          // return final response
          sendFinalResponse(pipeline, sendResponse);
        })
        .catch(err => {
          throw new Error(err);
        })
    })
    .catch(err => {
      throw new Error(err);
    })
}

function createPipeline(sendResponse) {
  const pipelineInput = {
    displayOrder: 0,
    stages: [
      {label: 'Current Game Hits', displayOrder: 0, metadata: {ticketState: 'OPEN'}},
      {label: 'High Scores', displayOrder: 1, metadata: {ticketState: 'CLOSED'}}
    ],
    label: "Ticket Target Practice Game"
  }

  hubspotClient.crm.pipelines.pipelinesApi.create("tickets", pipelineInput)
    .then(result => {
      console.log(result.body);
      sendFinalResponse(result.body, sendResponse);
    })
    .catch(err => {
      throw new Error(err);
    })
}
In removeOldTickets(), we craft a request to the ticket API’s tickets.searchApi.doSearch endpoint that looks for tickets in our game-specific pipeline, in the first Current Game Hits stage, with a very optimistic limit of 100 items. Then, we pass those IDs to the tickets.batchApi.archive endpoint to delete them. Finally, we call sendFinalResponse() with the pipeline and the sendResponse callback.
In createPipeline(), we actually create the pipeline we’ve heard so much about. It’s pretty easy: we pass in stages, with their own order and label and ticketState, and we give the pipeline its own unique label. Then we send that to the pipelines.pipelinesApi.create endpoint. With the response, we pass our brand new pipeline object to sendFinalResponse() as well.
Now for the final piece: the sendFinalResponse() function, where we make use of sendResponse():
function sendFinalResponse(pipeline, sendResponse) {
  sendResponse({
    statusCode: 200,
    body: {
      message: 'Level 1!',
      config: {
        key: 'target',
        repeat: 2,
        setXY: { x: 40, y: 285, stepX: 100}
      },
      pipeline: pipeline
    },
  });
}
Here, we craft the config object that’ll allow the game to create the targets using targets.createMultiple(). We also pass along the pipeline object, so that we don’t have to search for it every time we want to update the game state in the future.
With that final piece, you should be able to load the game and play the first level. Your browser console should look something like this:

Working on update_game
The /update_game function and endpoint is there to record the score and return the next level if the game hasn’t ended, or to tally and return the high score if game_over is true. To that end, we send it a game_over boolean, and check that right away.
At the top of update-game.functions/update.js, let’s add this:
const hubspot = require('@hubspot/api-client');
const hubspotClient = new hubspot.Client({ apiKey: process.env.hubapikey});

exports.main = ({ accountId, body, params }, sendResponse) => {
  var pipeline = body.pipeline;
  var level = body.level + 1;

  if (body.game_over != true) {
    // game continues!
    var score = body.hit_targets * 100;

    var config;

    if (level < 3) {
      config = {
        key: 'target',
        repeat: 2,
        setXY: {x: 40, y: 285, stepX: 100}
      }
    } else if (level < 7) {
      config = {
        key: 'target',
        repeat: 2,
        setXY: {x: 40, y: 210, stepX: 100, stepY: 72}
      }
    } else {
      config = {
        key: 'target',
        repeat: 4,
        setXY: {x: 40, y: 135, stepX: 40, stepY: 72}
      }
    }

    console.log("score is " + score);
    createTicket(score, level, config, pipeline, sendResponse);
  } else {
    // the game is over!
    createHighScoreTicket(body.name, pipeline, sendResponse);
  }
};
If the game hasn’t ended yet, we create a new config, then pass all the necessary response stuff along to createTicket(). But if it’s game over, we simply call createHighScoreTicket().
Let’s make those createTicket() and createHighScoreTicket() functions now.
function createTicket(score, level, config, pipeline, sendResponse) {
  // create tickets for the level's score
  const simplePublicObjectInput = {
    properties: {
      hs_pipeline: pipeline.id,
      hs_pipeline_stage: pipeline.stages[0].id,
      subject: score
    }
  }

  hubspotClient.crm.tickets.basicApi.create(simplePublicObjectInput)
    .then(result => {
      console.log(result.body);

      // looks good, now send new level
      sendResponse({
        statusCode: 200,
        body: {
          message: 'Level ' + level,
          level: level,
          config: config,
          game_over: false
        },
      });
    })
    .catch(err => {
      throw new Error(err);
    });
}
createTicket() is pretty straightforward! We craft an object to send to the tickets.basicApi.create endpoint, which includes the pipeline and stage details, as well as the score for the level. In handling the response, we call sendResponse() and send back the new level, config, and a message to the client.
function createHighScoreTicket(name, pipeline, sendResponse)
{
  // first, search for the tickets which we'll sum up
  const publicObjectSearchRequest = {
    filterGroups: [
      {
        filters:
        [
          {value: pipeline.id, propertyName: 'hs_pipeline', operator: 'EQ'},
          {value: pipeline.stages[0].id, propertyName: 'hs_pipeline_stage', operator: 'EQ'}
        ]
      }
    ],
    sorts: ['id'],
    properties: ['id', 'subject', 'time_to_close'],
    limit: 100,
  };

  hubspotClient.crm.tickets.searchApi.doSearch(publicObjectSearchRequest)
    .then(results => {
      // sum up their scores
      var score = results.body.results.reduce((a,b) => a + parseInt(b.properties.subject), 0);
      console.log("Score is: " + score);
      // create a new ticket in the second stage of the pipeline
      const simplePublicObjectInput = {
        properties: {
          hs_pipeline: pipeline.id,
          hs_pipeline_stage: pipeline.stages[1].id,
          subject: JSON.stringify({ name: name, score: score })
        }
      }

      hubspotClient.crm.tickets.basicApi.create(simplePublicObjectInput)
        .then(result => {
          console.log(result.body);

          const subjectObject = JSON.parse(result.body.properties.subject);
          // return the score and call it game over
          sendResponse({
            statusCode: 200,
            body: {
              message: 'Game Over',
              game_over: true,
              score: subjectObject.score
            }
          });

        })
        .catch(err => {
          throw new Error(err);
        });
    })
    .catch(err => {
      throw new Error(err);
    });
}
In createHighScoreTicket(), we have to do a little more heavy lifting. First, we use tickets.searchApi.doSearch to search for all of the tickets that tracked the scores in individual levels, which are all in the first stage of the pipeline.
Then we sum the scores up from all those tickets that represent the individual levels, and create a new ticket using tickets.basicApi.create in order to track where we put the stringified JSON of the score and the user’s name as the ticket’s subject. It’s a little hacky, but it’ll come in handy in our next tutorial when we want to display the high scores. Finally, we send a response where we inform the user that it truly is game over, and show them their high score.
That’s it! You should be able to keep playing until you miss all the targets in the level. At that point, you’ll see this message:

Hopefully you’ll get a higher score than I did.
Conclusion
That’s all for now. We created a frontend game using Phaser.js and embedded it in a module, then published it using a template. Then, we handled the backend by creating two serverless functions to begin and update the game as we played it. The result: all the carnival game fun we could hope for.
Deal Fishing Tutorial
September 1 draft
Welcome to the HubSpot Deal Carnival. While you learn how to create a fun, in-browser game using the Phaser.js game framework using skills you’ve already got as a web developer, you’ll also get familiar with the HubSpot platform. In fact, we’re going to use HubSpot’s APIs to make our games work, and HubSpot’s platform will even make it possible for us to deploy our frontends, securely interact with HubSpot APIs, and link our games together into a Vue.js-backed scoreboard.
This is the first tutorial in a series, and it’s all about getting you started and productive (while learning a new trick or two). We’ll get you signed up and familiar with HubSpot’s platform and dev tools, then you’ll build a Deal Fishing minigame. Finally, we’ll integrate the game with HubSpot’s contacts API by using HubSpot Serverless Functions.
Getting set up with HubSpot
Sign up for HubSpot
We’re going to sign up for a HubSpot developer account. That’ll let us have a sandbox to safely explore the APIs, and build our carnival games. https://app.hubspot.com/signup/standalone-cms-developer
Once you’ve got that, we’re ready to get using any HubSpot features. We’ll be using the HubSpot CMS to deploy our games, the HubSpot CLI to develop locally and push our game to HubSpot’s cloud-based CRM, and we’ll use HubSpot Serverless Functions to securely speak to the various APIs we’ll be using.
Using the HubSpot CLI
To get started with the CLI, you can follow the instructions here:
// TODO:
https://developers.hubspot.com/docs/cms/developer-reference/local-development-cms-cli
Downloading and configuring it
To download the HubSpot CLI:
npm install -g @hubspot/cms-cli
That’ll install it globally. If you ever need a reference on the full scope of the CLI and how it works for local development, just check out this page.
Next, let’s initialize and authenticate in the appropriate folder. Create a new folder – maybe call it hubspot-local – and move into it:
mkdir hubspot-local
cd hubspot-local
hs init
You’ll first get a prompt to press Enter to get sent to a website to generate your personal CMS access key. Press enter!
Select the account you created above – if it doesn’t show up by default, press the “View your other accounts” button. Make sure you’re selecting the sandbox account you created above, or else you might send make a mess of your organization’s HubSpot data.
At the next screen, be sure to select all the checkboxes under “Permissions.” That’ll allow us to get the full local development experience, and to complete this tutorial without a hitch. And as a security note, this CMS access key is for your HubSpot CLI – not for the game you’ll be making.
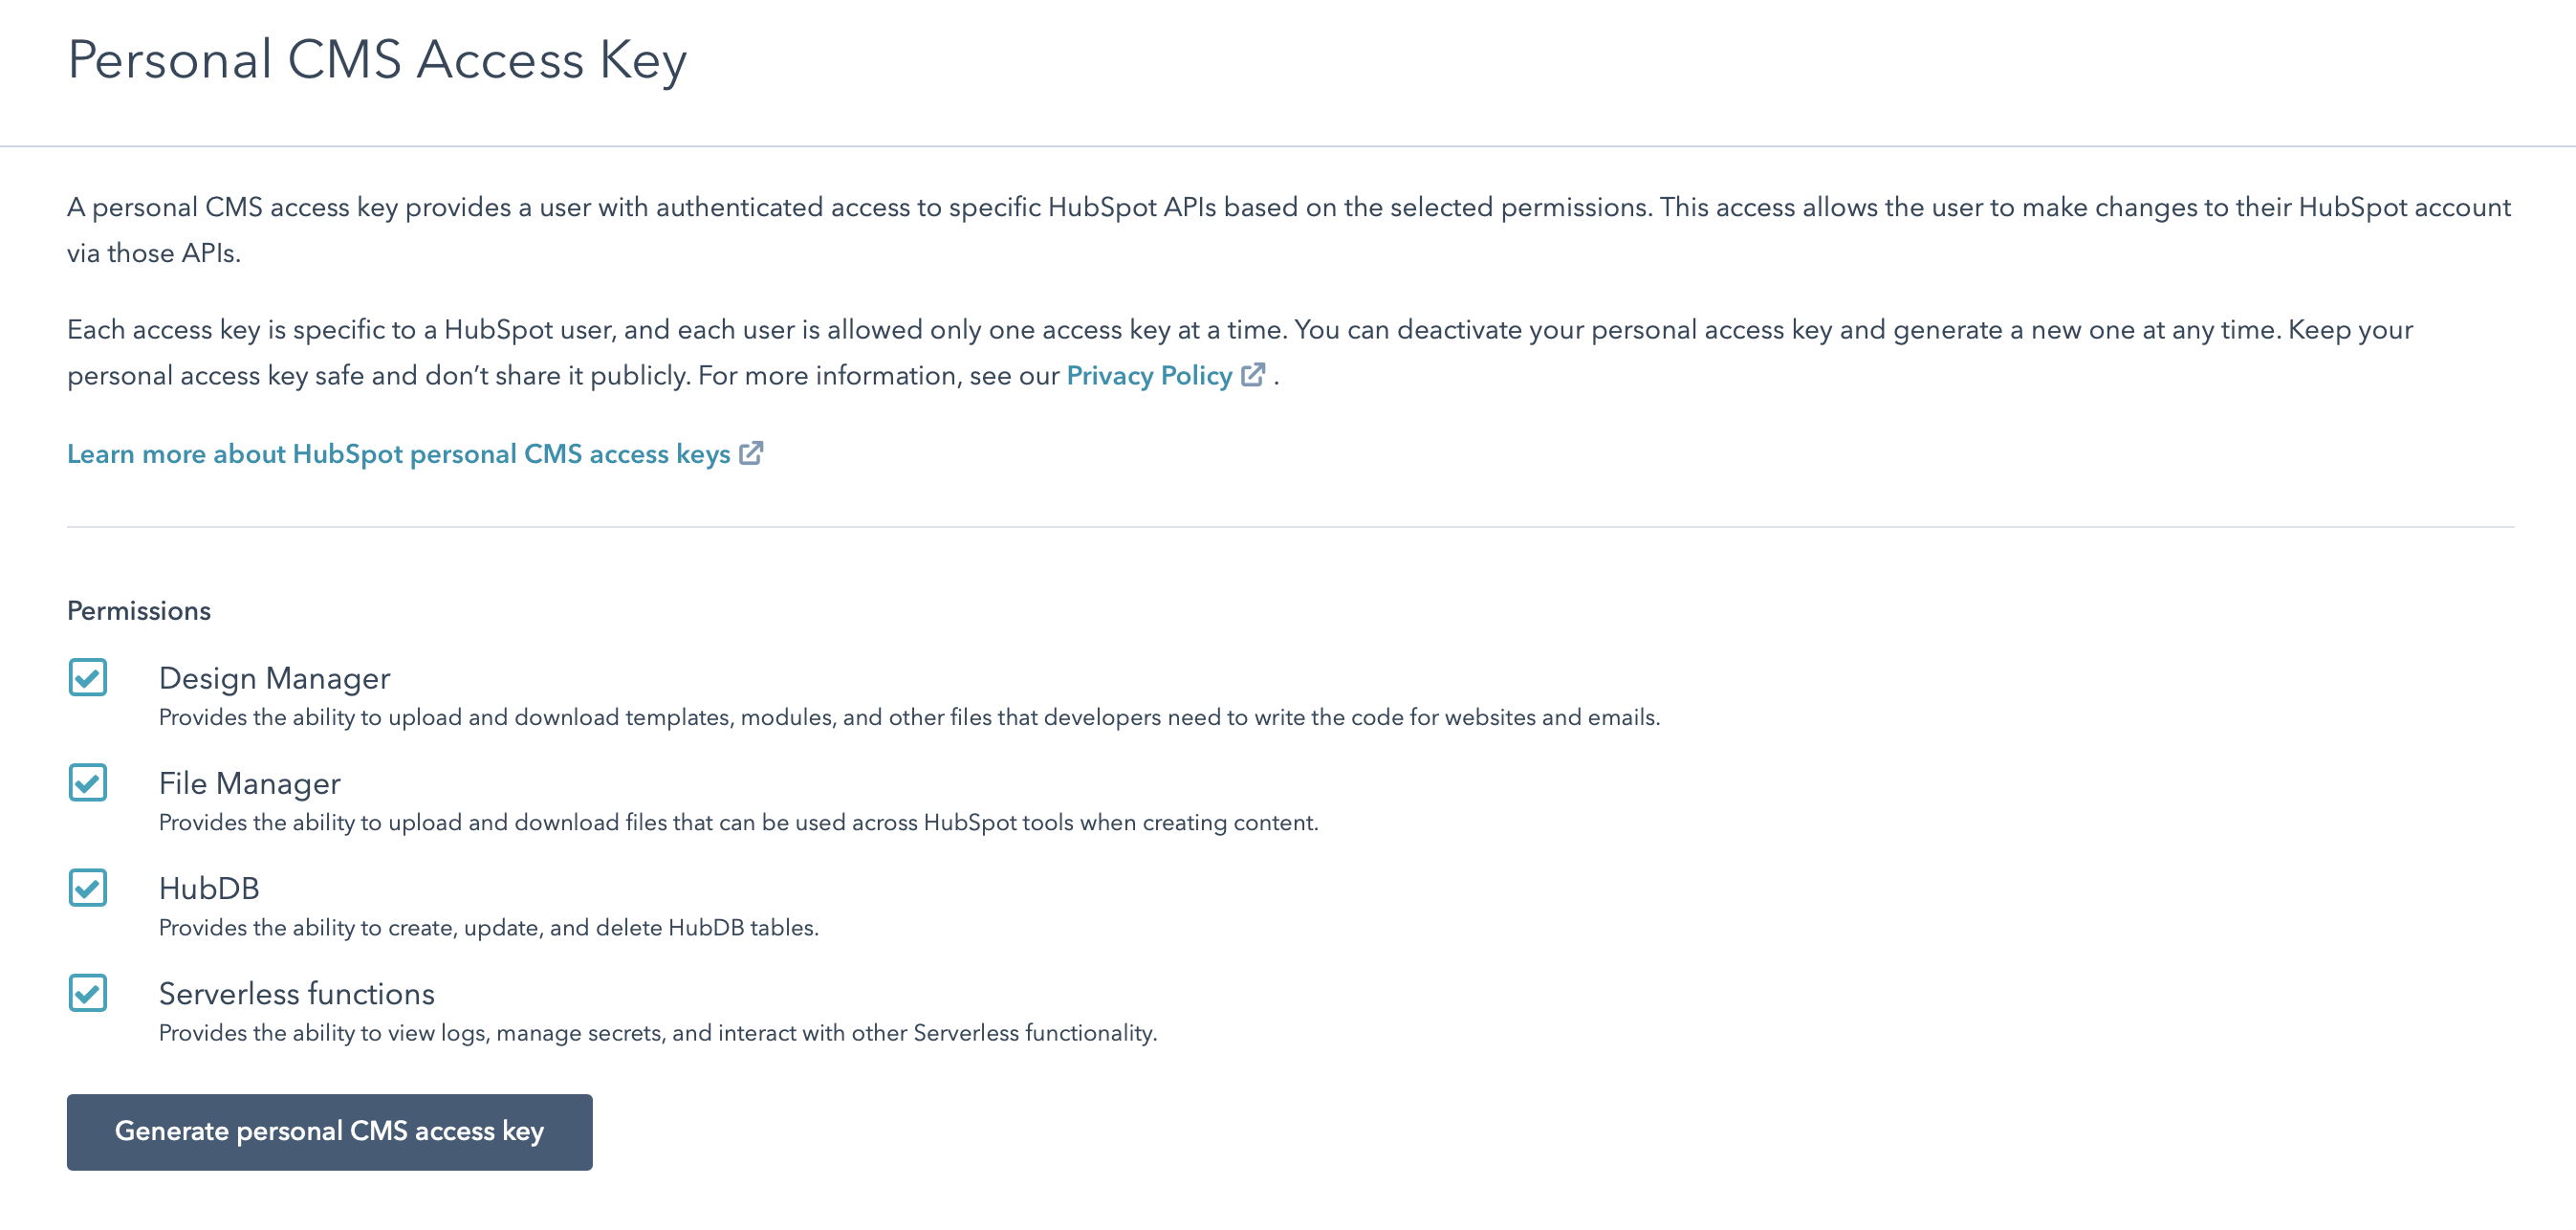
On the next screen you can copy your personal CMS access key; go back to your terminal and paste it there. Give the account a nickname you’ll remember (I used carnival-account ). You can now open up the hubspot.config.yml file in this folder, and you’ll see all the info you just entered.
Bonus tip: if you’ve got many accounts added to your CLI already, it might be a good idea to switch the defaultPortal value to the nickname of the new sandbox account you added. That way, you won’t accidentally make changes to someplace you shouldn’t.
Creating and pushing your first module
Now that we’re ready to use the CLI, let’s create a module. The module is where we’ll be doing our coding, and it’s what will get deployed to HubSpot – so that we can see our game deployed and playable in the cloud, simply by navigating to a HubSpot browser. Through modules we can also get the game to interact with Serverless Functions, which will let our simple game demo connect to the HubSpot API.
It’s just one command:
hs create module deal-fishing
? What should the module label be? Deal Fishing
? What types of content will this module be used in? Page
? Is this a global module? No
Creating ~/hubspot-local/hubspot-carnival/deal-fishing.module
Creating module at ~/hubspot-local/hubspot-carnival/deal-fishing.module
Fun! Let’s see what’s in there:
/deal-fishing.module:
> fields.json
> meta.json
> module.css
> module.html
> module.js
Modules are pretty simple. They’re just folders that end with a .module name, and they have to contain these five files.
Sync a module to HubSpot
From the deal-fishing.module folder, run:
hs watch . deal-fishing.module
After watch , we’ve got . for the root hubspot-local folder that we’re in, and we want it to show up in the HubSpot Design Manager as deal-fishing.module.
Let’s go see if it showed up. Sign into HubSpot with your sandbox account, then in the top bar, navigate from Marketing > Files and Template > Design Tools. You’ll see a sidebar that should show your new deal-fishing module:
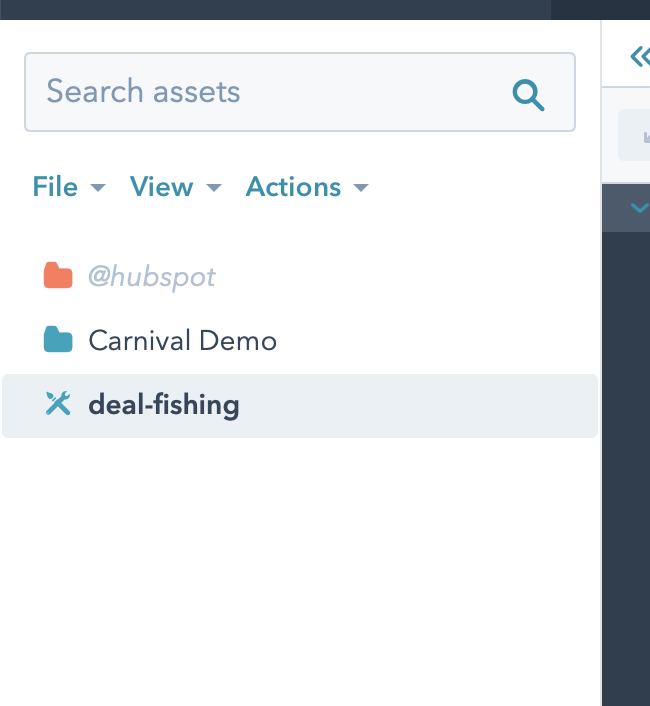
Select it, and you’ll see an editor – it automatically displays the html, css and js files that we’ll be working in. You can happily work there for the rest of this tutorial, but I’ll be writing instructions for local development, where you can use your favourite shell and text editor.
Live updates to your module
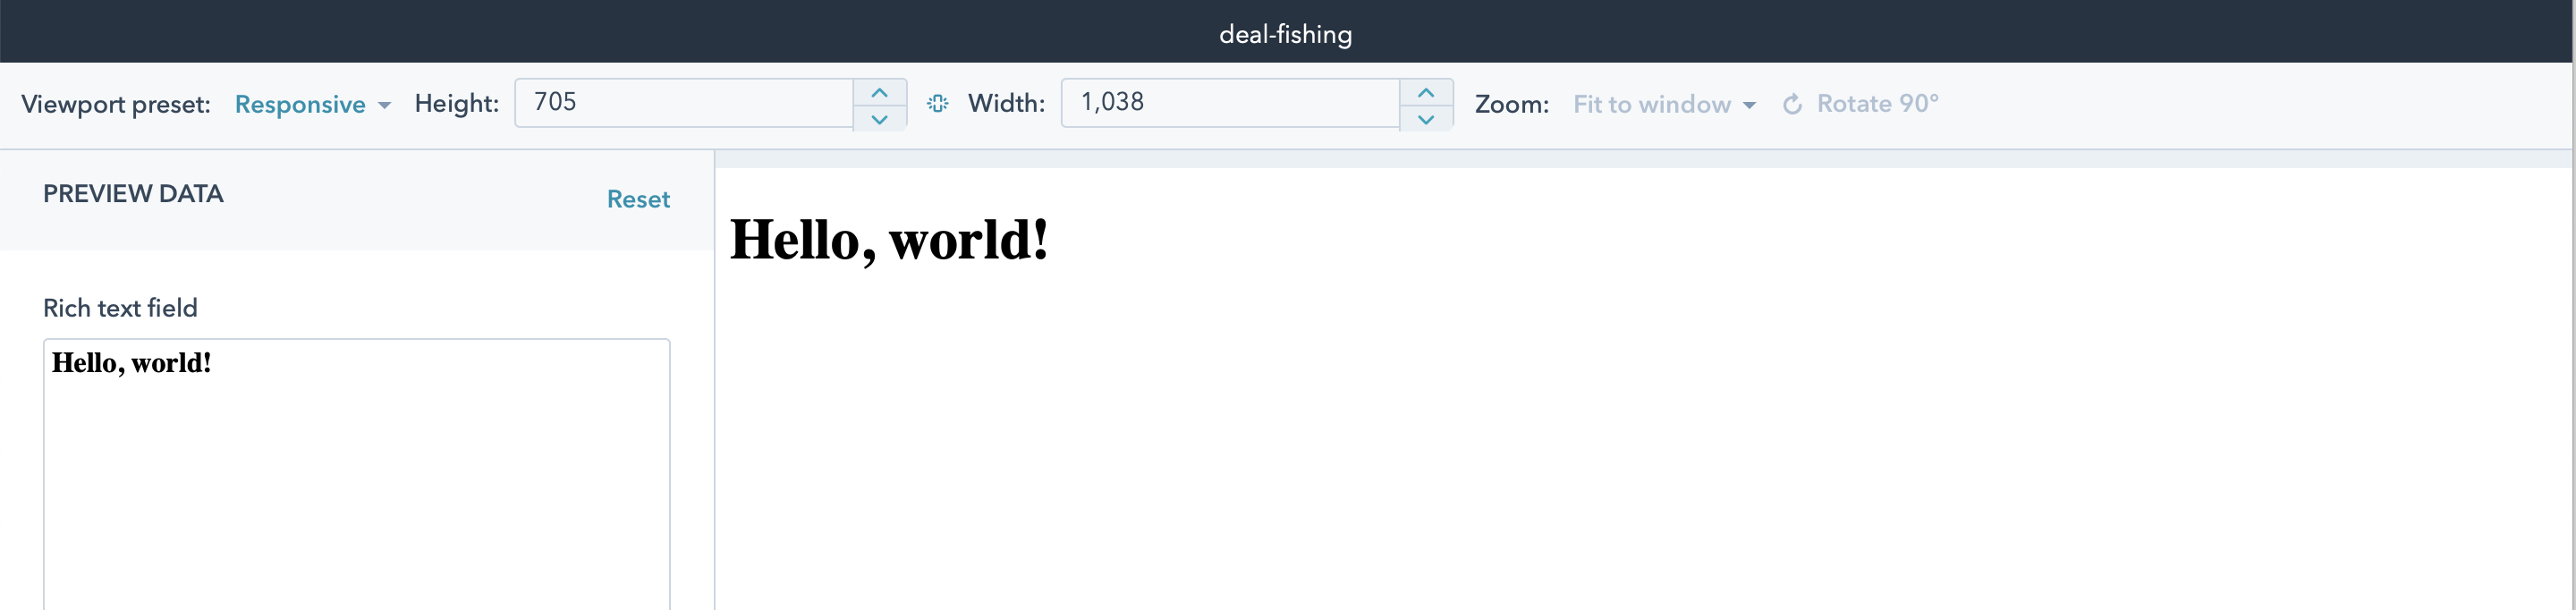
Before we head back to our local development, we’re going to open the preview URL from the Design Manager.

There’s nothing there yet – just a sample “rich text field” and an empty page. But that’s where we’ll see our changes show up.
Head back to your terminal, and open module.html with your favourite text editor. Make sure that hs watch is still running, and edit the file to look as follows:
<!-- module html  -->
<div>Hello, world!</div>
Now save it, and you should see the changes show up immediately in your preview:
Great. Now that we’ve learned how to work locally with the HubSpot CMS, we’re ready to get working with Phaser!
Creating Deal Fishing
Introducing Phaser.js
Phaser.js is a JavaScript game framework that works in any modern browser. It handles many things for you, including display and graphics, physics (which includes gravity and collisions), and more – all by tracking game objects, and passing events between them. We’ll learn how to wire up your game objects so they do what you want them to.
Setup and loading of assets (like sprites, which are images that’ll turn into your characters, or sound effects) is handled in preload , and create is where you’ll turn those assets into actual game objects. Those two methods are run once, at the creation of the game instance.
After that, the game loop continuously calls the update function. We can also respond to events emitted by animations, game objects, and more – we just have to subscribe to them and pass them a callback. We’ll learn more about when it’s appropriate to use update as opposed to handling changes in an event-driven way with callbacks.
That’s probably enough introduction! What better way to learn how this all works than to just get started? We’ll walk through preload, create and update in turn.
Creating the Deal Fishing mini game
First, download the assets we’ll be using from this link:
// TODO
Unzip those, and add them to your hubspot-local folder. We’ll come back to the assets in a few steps.
Next, copy and paste this boilerplate into the module.js file that was created in your deal-fishing.module folder:
var config = {
    type: Phaser.AUTO,
    width: 800,
    height: 600,
    physics: {
      default: 'arcade',
      arcade: {
        gravity: { y: 0 },
        debug: false
      }
    },
    scene: {
        preload: preload,
        create: create,
        update: update
    }
};

var pond;
var pondGroup;
var player;
var fishingZone;

var cursors;
var spacebarHeld = false;

var score = 0;
var scoreText;

var fishText;

var game = new Phaser.Game(config);

function preload ()
{
	// this gets called once at the very beginning when `game` is instantiated
}

function create ()
{
	// this gets called once, after `preload` is finished
	// anything loaded in `preload` is guaranteed to be accessible here
}

function update ()
{
	// the game loop calls `update` constantly
}
In this skeleton, we create the game object by passing it a config, which defines some basic pieces of what our game will contain (such as having arcade physics with a gravity key with y set to 0 – meaning it’s a top-scrolling game). We also define the variables we’ll be using later on as we load, use, and update our game objects.
And in your module.html file, we’ll add a couple lines so that it looks like this:
{{ module.text }}
{{ require_js('https://cdn.jsdelivr.net/npm/phaser@3.24.1/dist/phaser.min.js', 'head')}}
So far, we’ve loaded Phaser via a CDN. The require_js template tag there is part of the HubL templating language. Using it in your code rather than <script> gives you some helpful automatic optimizations, like preventing you from accidentally loading the same library many times over all your modules. And for Phaser to work, we need to have it load in the header, so we pass in the head parameter here to indicate to the CMS where it should load the script.
Now, let’s look back at the live preview. You can treat this window just like you would any tab you were using for local development. You can open up your browser’s Developer Tools and examine the console. Also, you can take a peek at the source of the page to see how the CRM nicely merged your module.js code, imported the Phaser.js file, and got things ready.

Right now, all we can see is the "Hello, world!" heading. That’s because of our text field, which is accessible via the HubL template tag ``. If we want to change that to Deal Fishing, just click on the field on the left of the Previewer screen:
Easy. That whole field is in rich, styled text, so all relevant HTML tags are included with the template tag already.
Otherwise, there’s not a lot to look at. That’s because we haven’t yet added any assets! So let’s try that out in preload().
Getting our assets ready to use
Loading your assets
Phaser loads everything upfront using the preload() function. So open up your module.js file, and add the following to preload() :
function preload ()
{
	// this gets called once at the very beginning when `game` is instantiated
  this.load.image('ground', 'https://f.hubspotusercontent20.net/hubfs/REPLACE_ME/assets/map.png');
	this.load.spritesheet('pond', 'https://f.hubspotusercontent20.net/hubfs/REPLACE_ME/assets/pond.png', { frameWidth: 54, frameHeight: 39});
	this.load.spritesheet('tile', 'https://f.hubspotusercontent20.net/hubfs/REPLACE_ME/assets/tile.png', { frameWidth: 16, frameHeight: 16});

	this.load.spritesheet('fishA', 'https://f.hubspotusercontent20.net/hubfs/REPLACE_ME/assets/FishA.png', { frameWidth: 16, frameHeight: 16});

	this.load.spritesheet('player', 'https://f.hubspotusercontent20.net/hubfs/REPLACE_ME/assets/hero.png', { frameWidth: 16, frameHeight: 24});
}
It’s pretty straightforward code: we use the load instance store on the scene to load an image, and also some spritesheets, which we’ll soon add to our game and make visible.
However, you still need to upload your assets, and replace the REPLACE_ME section of the URL with your own account’s unique ID.
Uploading your assets to HubSpot’s File Manager
To upload your assets and make them available to your module, we’ll use HubSpot’s File Manager to help us serve the files and make them accessible to our module in the cloud. I’ll show you how to upload from the CLI, and then see those files in the File Manager.
In your terminal, you should be in your root hubspot-local directory, and it should look like this:
deal-fishing.module/
assets/
hubspot.config.yml
Now, we’ll just upload the assets folder to the File Manager with the following command:
hs filemanager upload assets assets
That’ll take our local assets folder and put it in a new top-level folder on the File Manager also called assets .
Now, open your sandbox account back up in HubSpot, and open the File Manager from the top navigation bar:
Marketing > Files and Templates > Files
That’ll show you a screen like this:
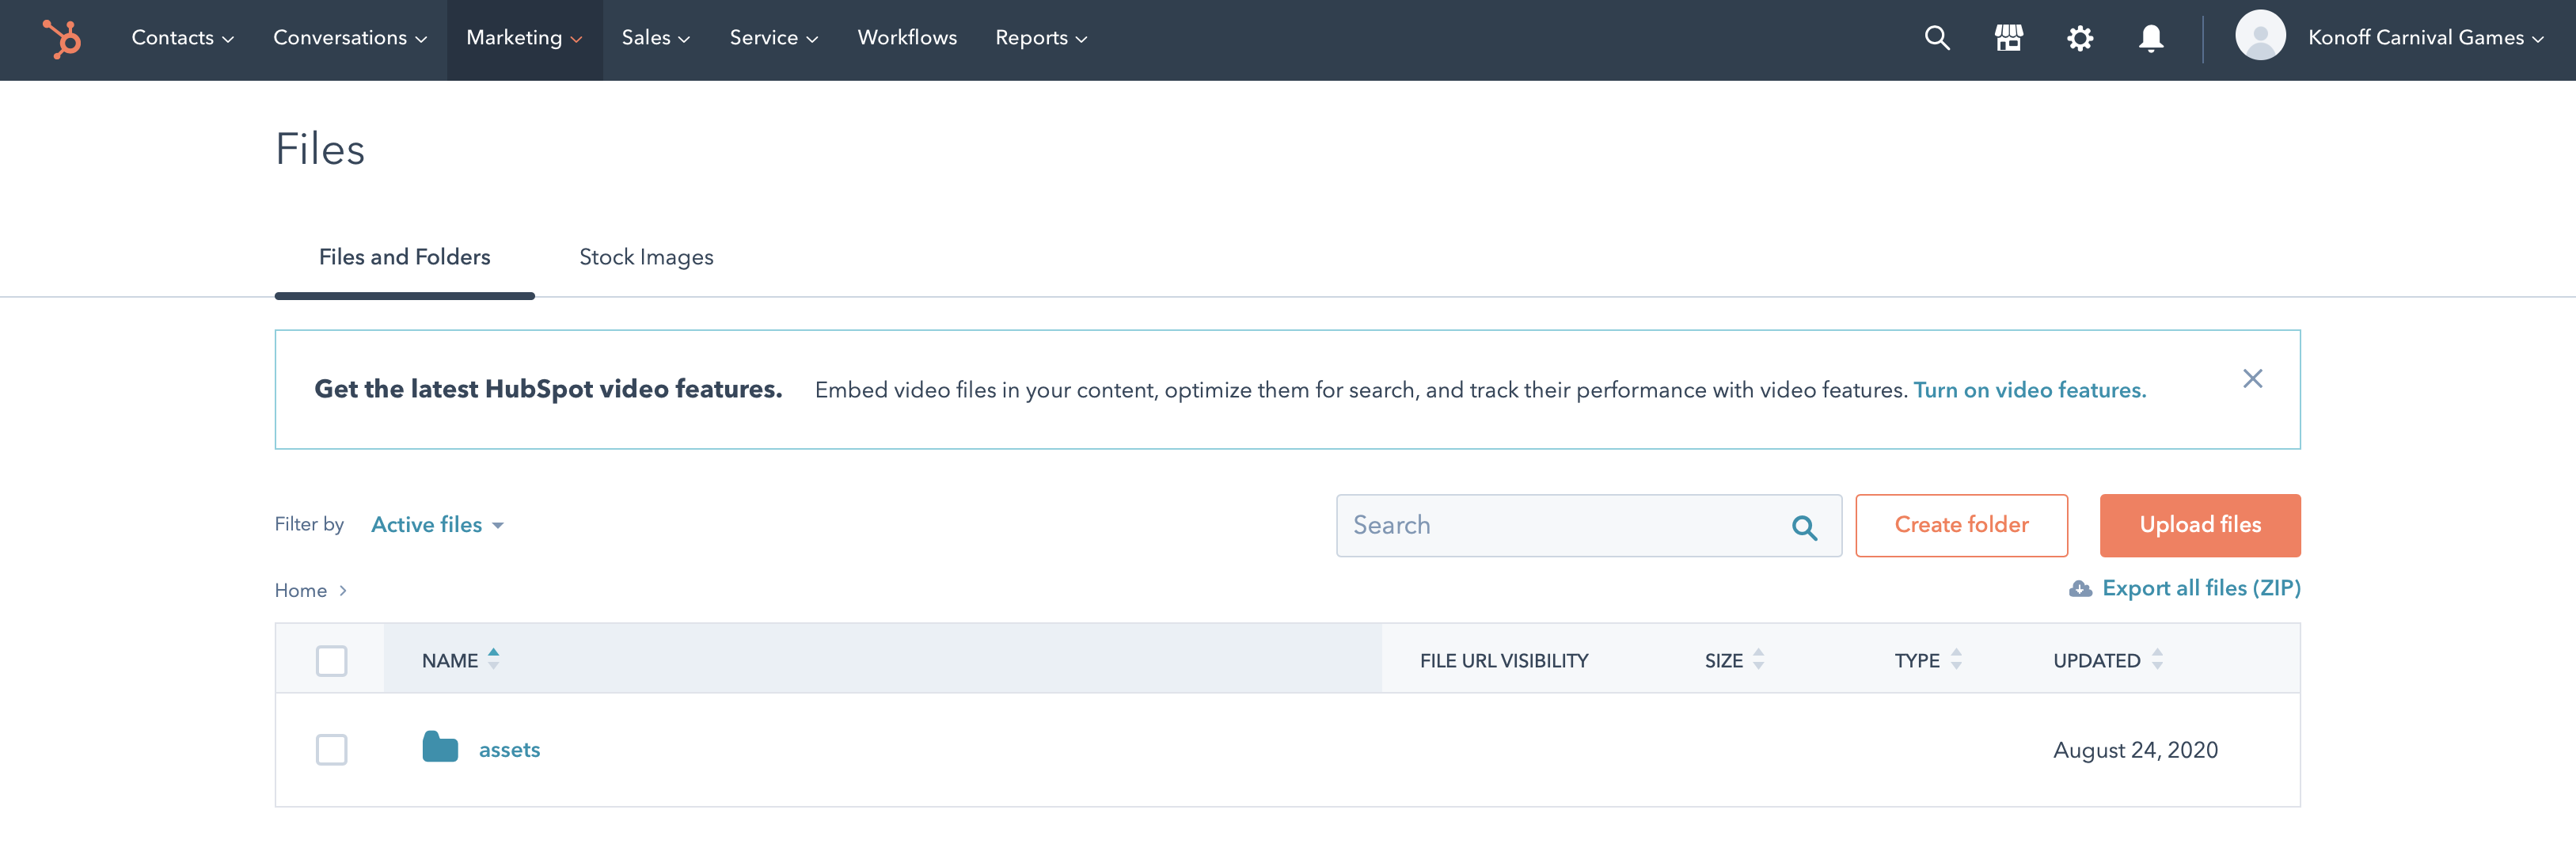
Great! It looks like it worked – you can see assets hanging out there. Now, open up the assets folder, and select any of the files. We’ll be using their URL to load the file into Phaser. When you’ve clicked on a file inside the assets folder, a sidebar opens. Press ‘Copy URL’:

That should give you a URL like https://f.hubspotusercontent20.net/hubfs/1234567/assets/atlas.png . Now we’re going to add that URL in front of our assets. Take the first part of the URL – the part before /assets/atlas.png , and add it to each load call URL so that your code looks like this:
function preload ()
{
	// this gets called once at the very beginning when `game` is instantiated
  this.load.image('ground', 'https://f.hubspotusercontent20.net/hubfs/1234567/assets/map.png');
	this.load.spritesheet('pond', 'https://f.hubspotusercontent20.net/hubfs/1234567/assets/pond.png', { frameWidth: 54, frameHeight: 39});
	this.load.spritesheet('tile', 'https://f.hubspotusercontent20.net/hubfs/1234567/assets/tile.png', { frameWidth: 16, frameHeight: 16});

	this.load.spritesheet('fishA', 'https://f.hubspotusercontent20.net/hubfs/1234567/assets/FishA.png', { frameWidth: 16, frameHeight: 16});

	this.load.spritesheet('player', 'https://f.hubspotusercontent20.net/hubfs/1234567/assets/hero.png', { frameWidth: 16, frameHeight: 24});
}
Bravo. You’ve written your first chunk of code for Phaser. Let’s walk through it!
this refers to the scene. A scene contains game objects – it’s a bit like the world that you’re immediately playing in. More complicated games can have several different scenes that the game will move you through (for instance, as you’d complete one level and move onto the next). But we’re going to do all our work in just one of them.
After that, we call the spritesheet and image methods. What’s the difference? Well, image just takes the whole image, figures out its dimensions, and pastes it on the screen. But if we want to create animations, or just select one piece of an image to create a game object from, we should use spritesheet . Our player uses a spritesheet, but the main part of the map just uses image .
Each spritesheet and image is passed two parameters. The first is the key we’ll use to refer to the asset in the future – for atlas.png , it’s ground .
Now we’re ready to start adding stuff to the map, and we’ll see our first game objects appear.
Creating your scene
Let’s take those assets and put them to use!
First, we’ll add our main map – the atlas.png image, which we’ve given a key of ground . Now, in create() , we’ll get to use it:
function create ()
{
	// this gets called once, after `preload` is finished
	// anything loaded in `preload` is guaranteed to be accessible here

  // a generic background tile
  this.add.tileSprite(400, 300, 800, 600, "tile");

  // the nicer background
  this.add.image(400, 300, 'ground').setScale(2);

  // the on-screen text for scores and fish info
  scoreText = this.add.text(700, 550, "Score: 0", { align: 'right', fontFamily: 'Helvetica', color: 'black' });
  fishText = this.add.text(400, 50, "Welcome to Deal Fishing!", { align: 'center', fontFamily: 'Helvetica', color: 'black' });
  fishText.setOrigin(0.5);

  // let's create the pond we'll fish in
  pondGroup = this.physics.add.staticGroup();

  pond = pondGroup.create(390, 420, 'pond', 0).setScale(2).refreshBody();

  // create player
  player = this.physics.add.sprite(100, 450, 'player').setScale(2).refreshBody();
  player.setCollideWorldBounds(true);

  // create a collider between the player and the pond
  this.physics.add.collider(player, pondGroup);

  // create a zone to track when the player can fish
  fishingZone = this.add.zone(pond.x, pond.y, pond.width + 2, pond.height).setScale(2);
  this.physics.world.enable(fishingZone);


  // player animations

  this.anims.create({
    key: 'sideways',
    frames: this.anims.generateFrameNumbers('player', { start: 0, end: 2}),
    frameRate: 10,
    repeat: -1
  });

  this.anims.create({
    key: 'down',
    frames: this.anims.generateFrameNumbers('player', {start: 8, end: 10}),
    frameRate: 10,
    repeat: -1
  });

  this.anims.create({
    key: 'cast',
    frames: [ {key: 'player', frame: 3}],
    frameRate: 20,
    repeat: -1
  });

  this.anims.create({
    key: 'up',
    frames: this.anims.generateFrameNumbers('player', {start: 4, end: 6}),
    frameRate: 10,
    repeat: -1
  });

  this.anims.create({
    key: 'caughtFish',
    frames: [{key: 'player', frame: 13}],
    frameRate: 20,
    repeat: -1
  });


  // pond animations
  this.anims.create({
    key: 'pondFishing',
    frames: this.anims.generateFrameNumbers('pond', {start: 1, end: 2}),
    frameRate: 1,
    repeat: -1
  });

  this.anims.create({
    key: 'pondStill',
    frames: [ {key: 'pond', frame: 0}],
    frameRate: 20,
    repeat: -1
  });

  this.anims.create({
    key: 'pondBite',
    frames: this.anims.generateFrameNumbers('pond', {start: 3, end: 4}),
    frameRate: 5,
    repeat: 4
  });

  // create cursors for the pond
  cursors = this.input.keyboard.createCursorKeys();
}
There are three broad sections here. The first is where we set up a few game objects and define how they interact: the player’s object, the pond, and the fishing zone. The player and pond are both visible, but the zone isn’t – it’s an invisible layer that is just a teensy bit bigger than the pond, which we use to check for overlaps later on. We also set up some collisions and physics interactions there.
The second section is where we create a bunch of animations for the player and the pond. That’ll help us communicate what’s happening to the player. It’s one thing to have game logic that works, but without making it obvious through animations, it’s not that helpful! Each animation is tied to the above assets that we loaded in preload() - we generate an animation from spritesheets we created there. We also give each animation its own key so that we can easily use it later on.
Also, every animation has a -1 repeat value, except for the pondBite animation. Why is that? Because -1 means the animation repeats indefinitely, we’ll have to manually stop those animations or change the animation to another one. For pondBite, we want it to run for a limited amount of time so as to make the game harder. So it repeats 4 times, for a total of about 1 second. After all, fish don’t hold on forever.
Finally, we need some way to notice what the player does, so we create inputs using the cursors variable.
If you save your module.js file now, that should show up immediately in your Previewer – but it’s probably boring to play, as we haven’t done anything with the inputs yet:

That means we better go and get the player inputs working, as well as trigger specific animations in response to the right inputs.
Handle inputs and trigger animations
function update ()
{
  if (player.state != "fishing") {
    // movement should be allowed when they're not actively fishing
    if (cursors.up.isDown) {
      player.setVelocity(0, -160);

      player.anims.play('up', true);
    } else if (cursors.down.isDown) {
      player.setVelocity(0, 160);

      player.anims.play('down', true);
    } else if (cursors.left.isDown) {
      player.setVelocity(-160, 0);

      player.setFlipX(false);
      player.anims.play('sideways', true);
    } else if (cursors.right.isDown) {
      player.setVelocity(160, 0);

      player.setFlipX(true);
      player.anims.play('sideways', true);
    } else {
      // if the above keys are being pressed, the user shouldn't be moving
      player.setVelocity(0, 0);

      player.anims.pause();
    }
  }

  // the player pressed space while inside the fishing zone, and isn't already holding the spacebar
  if (cursors.space.isDown && (this.physics.world.overlap(player, fishingZone)) && spacebarHeld === false) {
    spacebarHeld = true;
    console.log("Fishing!")

    if (player.state === "fishing") {
      // The player is currently fishing
      if (pond.anims.getCurrentKey() === "pondBite") {
        // they pressed space while there was a fish biting
        // successful catch!
        // first, create a fish object
        fish = this.physics.add.sprite(pond.getCenter().x, pond.getCenter().y, 'fishA', 4).setOrigin(0.5, 0.5).setScale(3).refreshBody();
        // then animate it up to the top of the player's head
        var tween = this.tweens.add({
          targets: fish,
          x: player.getTopCenter().x,
          y: player.getTopCenter().y,
          ease: 'Linear',
          completeDelay: 1000,
          onComplete: function () {
            fish.destroy();
            player.state = "normal";

            // TODO: POST new fish here
          }
        });

        // now we'll show the player celebrate
        player.anims.play('caughtFish', true);

        // we'll clear the pond's animation chain and reset everything
        pond.anims.stop();
        pond.anims.play('pondStill');
      } else {
        // the player missed the fish bite :(
        // now to stop fishing
        player.anims.play('sideways', true);

        pond.anims.play('pondStill', true);

        player.state = "normal";
      }

    } else {
      // The player should begin fishing!
      player.anims.play('cast', true);

      pond.anims.play('pondFishing');

      pond.anims.chain('pondBite');

      pond.anims.stopAfterDelay(Phaser.Math.Between(2000,4000));

      pond.on('animationcomplete-pondBite', finishedFishing);
      pond.anims.chain('pondFishing');

      player.state = "fishing";
    }

  } else if (cursors.space.isUp) {
    spacebarHeld = false;
  }
}

function finishedFishing (animation, frame, gameObject)
{
  if (player.state === 'fishing') {
    // stop the current animation
    pond.anims.stopAfterDelay(Phaser.Math.Between(2000,4000)); // random

    // add a new animation
    pond.anims.chain('pondBite');
    pond.anims.chain('pondFishing');

  }
}
That’s it – you’ve got a working game now!
The game continuously loops and calls the update() function. So, that’s where we respond to user-initiated input. Here, we have to basic sections. In the first set of conditions, we’re just making sure the user isn’t already fishing, and handle all the movement-based inputs behind that logic.
In the second set of conditions, we’re watching to see when we should get the user to start fishing, catch a fish, and stop fishing if they miss the fish. We create an animation chain that will show a fishing animation, then after a random amount of time will show the pondBite animation for a brief moment (remember: it runs for a limited amount of time, unlike the other animations), before returning to the typical fishing animation. In order to keep that going, we also have to create a callback, and so we subscribe to the animationcomplete-pondBite event. We get it to call the finishedFishing() function, where we then set up this same animation chain all over again if the player missed the opportunity to catch the fish on the first bite.
To keep track of what happens, we check what the player.state property is set to, as well as check what animation is playing. That’s all it takes to make a game!
Winning the game
When the player successfully catches the fish by pressing space when the pondBite animation is playing, we create a fish object, then animate it towards the player object using a tween object. It’s an object managed by the scene which allows us to manipulate values over time. We use it to change the x and y position of the fish, then pass an onComplete callback to destroy the fish and reset the player state to "normal" after a delay. Then they can go fish again.
That onComplete callback is also where we’ll be posting the fish to the Serverless Function that we’ll be making shortly. Take note:
…
onComplete: function () {
  fish.destroy();
  player.state = "normal";

  // TODO: POST new fish here
}
…
That’s it! If you open up your Previewer tab again, you can move your player around, get them to either side of the pond, and press spacebar to start fishing. Happy fishing, everyone!
Introducing Serverless Functions
Setting up the Serverless Function
hs create function "fishing-deals"
? Name of the folder where your function will be created: fishing-deals
? Name of the JavaScript file for your function: post-deals
? Select the HTTP method for the endpoint: POST
? Path portion of the URL created for the function: deals
Created "/Users/konoff/Developer/hubspot/1-deal-fishing/hubspot-components/fishing-deals/..functions"
Created "/Users/konoff/Developer/hubspot/1-deal-fishing/hubspot-components/fishing-deals/..functions/post-deals.js"
Created "/Users/konoff/Developer/hubspot/1-deal-fishing/hubspot-components/fishing-deals/..functions/serverless.json"
[SUCCESS] A function for the endpoint "/_hcms/api/deals" has been created. Upload "..functions" to try it out
Now, we’ll go into the fishing-deals/fishing-deals.function folder, and open up post-deals.js. That’s where our function lives. Every time we get a call to _hcms/api/deals, it runs the code in here. At the beginning, it just looks like this:
exports.main = ({ accountId, body, params }, sendResponse) => {
  console.log('Your HubSpot account ID: %i', accountId);
  sendResponse({
    statusCode: 200,
    body: {
      message: 'Hello, world!',
    },
  });
};
We’re going to make a few changes: we’ll create a random name for the fish, give it a score, post it to the HubSpot CRM (which we’ll use as our datastore), and return a 201 instead of a 200, as well as the score and name.
Add your API key
Before all that, let’s get your API key added to your CLI, then safely bundled into your Serverless Function.
First, head to your Account Settings to grab your API key. Make sure you select the appropriate sandbox account. You may have to create an API key if you haven’t before, then copy it.
Now, in your terminal, we’ll add the secret to the HubSpot CLI, which in turn makes it available in your cloud environment:
hs secrets add hubapikey YOUR_API_KEY
The secret "hubapikey" was added to the HubSpot portal: 8311725
Now, open up the serverless.json file in your function folder. We’ll add the name of the secret there, inside the secrets array:
{
  "runtime": "nodejs12.x",
  "version": "1.0",
  "environment": {},
  "secrets": ["hubapikey"],
  "endpoints": {
    "deals": {
      "method": "POST",
      "file": "post-deals.js"
    }
  }
}
That’s all we need to do to make hubapikey available in the function as an environment variable.
Back to the post-deals.js file, we’ll set it up to create a new contact each time you catch a fish:
var request = require("request");

var fishNames = ["Nemo",  "Bubbles",  "Jack",  "Captain",  "Finley",  "Blue",  "Moby",  "Bubba",  "Squirt",  "Shadow",  "Goldie",  "Dory",  "Ariel",  "Angel",  "Minnie",  "Jewel",  "Nessie",  "Penny",  "Crystal",  "Coral"]
var colors = ["White", "Yellow", "Blue", "Red", "Green", "Black", "Brown", "Azure", "Ivory", "Teal", "Silver", "Purple", "Navy", "PeaGreen", "Gray", "Orange", "Maroon", "Charcoal", "Aquamarine", "Coral", "Fuchsia", "Wheat", "Lime", "Crimson", "Khaki", "HotPink", "Magenta", "Olden", "Plum", "Olive", "Cyan"]

exports.main = ({ accountId, body, params }, sendResponse) => {
  console.log('Your HubSpot account ID: %i', accountId);
  console.log('Your fish size: ' + body.fish_size);

  var firstName = fishNames[Math.floor(Math.random() * fishNames.length)];
  var lastName = ("Mc" + colors[Math.floor(Math.random() * colors.length)]);

  console.log("The API key: " + process.env.hubapikey);

  var options = {
    method: 'POST',
    url: 'https://api.hubapi.com/crm/v3/objects/contacts',
    qs: {hapikey: process.env.hubapikey},
    headers: {accept: 'application/json', 'content-type': 'application/json'},
    body: {
      properties: {
        firstname: firstName,
        lastname: lastName,
        annualrevenue: body.fish_size
      }
    },
    json: true
  };

  request(options, function (error, response, body) {
    if (error) throw new Error(error);

    console.log("The " + firstName + " " + lastName + " contact was successfully created");

    sendResponse({
      statusCode: 201,
      body: {
        fish_name: (firstName + ' ' + lastName),
        score: body.properties.annualrevenue,
        message: ('Your fish is named ' + firstName + ' ' + lastName)
      },
    });
  });
};
From the top to the bottom, let’s walk through how our function works.
First, we import request using require(). That’ll let us make a POST request to the HubSpot /contacts API, which you can read more about here. Then we create a couple arrays to make some creative fish names.
Inside the exports.main method, we first log a couple helpful things, which we’ll be able to see in the logs. Then we create a first and last name, and add those to a request. Finally, we handle the request. If there’s no error, we use sendResponse() to send the saved fish name, score, and a helpful message back to the client.
Now we’re going to get a webpage going, so that we can test out the Serverless Function, and share our new working game.
Testing and publishing your game
Creating a Template
Templates allow you to combine as many modules as you’d like into a
Head back to your root hubspot-local folder, and create a new template in the CLI:
hs create template deal-fishing-demo
? Select the type of template to create: page
Creating file at ~/hubspot-local/deal-fishing-demo.html
That creates a simple deal-fishing-demo.html file. Open it up – you’ll see there’s already a special comment at the top indicating that it’s a template. Next, replace the template’s HTML with this:
<!--
    templateType: page
    label: Deal Fishing template
    isAvailableForNewContent: true
-->
<!doctype html>
<html>
  <head>
    <meta charset="utf-8">
    <title>{{ content.html_title }}</title>
    <meta name="description" content="{{ content.meta_description }}">
    {{ standard_header_includes }}
  </head>
  <body>
    {% module "module_YOURMODULENUMBER" path="/deal-fishing-tutorial", label="deal-fishing-tutorial" %}
    {{ standard_footer_includes }}
  </body>
</html>
We changed the label up top to be something easier to find, but the important line here is the first line in <body>. You’ll have to grab your module’s unique ID back in the Design Manager – just open the deal-fishing module in there, and scroll down to the bottom of the sidebar to copy a module template snippet:
Alternatively, if you have your Previewer tab open, you can just replace the module_YOURMODULENUMBER part of the template code with the final part of your Previewer’s URL. My URL is https://app.hubspot.com/design-previewer/1234567/modules/34070159116, so I’d change that to module_34070159116.
Now, we’ll create a new page using the template you just made. In the top bar, go to Marketing > Website > Website Pages, and press Create in the top right corner, then select Website page.
With the search bar in the top right, let’s search for “Deal Fishing template” and select that template. Finally, give it a name – maybe Deal Fishing Game. Click Create Page, then we’re nearly done.
But it won’t let us press publish yet. You’ll need to head to the Settings bar and do two things there. First, add a Page Title. Then copy the link to the page. Finally, press Publish, and open up your brand new page:
From the page link we just copied, we’re only going to copy the subdomain part of that URL:
http://yoursandboxusername-1234567.hs-sites.com
In this case, it’d be yoursandboxusername-1234567. That’s all we need to be able to call our Serverless Function from within the app. Keep that tab around just so we can test it.
Putting it all together
It’s time to put it all together by calling the function in our game’s code. Head back to your module.js inside the deal-fishing.module folder, and find the comment called // POST new fish here, inside the update() function. There, you should add this code:
// POST new fish here
fetch("//YOUR_SITE_SUBDOMAIN.hs-sites.com/_hcms/api/deals", {
  method: "POST",
  headers: {
    'Content-Type': 'application/json'
  },
  body: JSON.stringify({ fish_size: Phaser.Math.Between(75, 250)})
}).then(res => {
  return res.json()
}).then(data => {
  console.log(data);

  // update the score
  score += data.score;
  scoreText.setText("Score: " + score);

  // create a message about the fish you caught
  var fishSize = data.score;

  var fishMessage;
  if (fishSize > 200) {
    fishMessage = "You caught a huge fish!";
  } else if (fishSize > 100) {
    fishMessage = "You caught a very medium fish!";
  } else {
    fishMessage = "You caught a tiny little fish!";
  }
  fishText.setText(fishMessage + "\n" + data.message + ".");
});
Replace the YOUR_SITE_SUBDOMAIN with the page, save your changes, and refresh the new hs-sites.com page you created. If you open up your console in that tab, you’ll see something like this:

Finally, you can check your logs using the CLI. Just pass it the name of your serverless function – fishing-deals, in this case:
hs logs fishing-deals
2020-09-02T23:02:25.861Z - SUCCESS - Execution Time: 1853ms
{ body:
   { score: '200',
     message: 'Your fish is named Squirt McYellow',
     fish_name: 'Squirt McYellow' },
  statusCode: 201 }
2020-09-02T23:02:26.758Z	INFO	Your HubSpot account ID: 8311725
2020-09-02T23:02:26.765Z	INFO	Your fish size: 197
2020-09-02T23:02:26.765Z	INFO	The API key: YOUR_API_KEY
2020-09-02T23:02:27.686Z	INFO	The Squirt McYellow contact was successfully created
That’s it! In a coming tutorial, we’ll learn how to create scoreboard that’ll add up all our contacts annualrevenue property values to give us our high score for the day. For now, just enjoy the great outdoors and the HubSpot Carnival.
https://knowledge.hubspot.com/contacts/hubspots-default-contact-properties?_ga=2.230543132.1282486909.1598903654-1418744260.1597871852
No More: a self-care app for you and your apps
This post is the second in a series. You can read about the other apps I made here.

For the last year or so, I’ve been working on an app that makes your social media weirder, nicer, and less addictive. It lets you turn off individual features, like Instagram Stories, or Twitter replies. It lets you hide annoyances, or completely change how an app works and feels. In short, it lets you exercise a degree of autonomy over Facebook, Instagram, and Twitter – apps that give you little to no choice about what you see. Apps that insist on showing you what will drive maximum engagement, no matter how damaging that is to you.
The app is called No More. And in the last couple weeks, as I’ve been putting the finishing touches on it, and after receiving the final illustrations for its settings, I’ve been considering whether or not it’s okay to release it. Since the death-by-strangulation of George Floyd under the knee of a police officer who had 18 complaints against him, who refused to hear the pleas of a man dying under his boot, I’ve been considering something about my use of social media that’s a little uncomfortable to acknowledge, and which I’ve been worried this app could exacerbate.
Read moreI Made an App to Stop My Compulsive Spending
(With the Power of Feelings)
This year, I pledged to make some dang apps again, but unlike the apps that I did for my startup years ago, these would be things made in no one’s interest but my own. I wanted to know: could technology, deliberately made and applied, allow me to connect with some important part of myself?
This post is the first in a series. Eventually, you can read about the other apps here.
I have a problem with spending. Like most things in my life, it fluctuates wildly as a counterforce to give me emotional stability. Money can do many things: chiefly, it can add novelty and surprise and promise and hope. It promises transformation with no other effort required than the spending of it.
The problem comes when I fail to actually hear what I need, or actively crush and abandon those feelings, and then use money to make up the difference. What hope can you have for feeling whole and happy if you live in constant denial of your needs, always trying harder and with higher stakes to make up for not having listened to yourself in the first place? We’ll get to why I do that in another post, maybe, but it should suffice to say: there are a lot of reasons why it’s hard for me to hear myself.
Read moreHealing is about releasing
I do olympic lifting as my main sport. And even before rupturing my achilles tendon (in a fateful night of rec league soccer), I was stuck. I couldn’t seem to make any progress and lift anything more than what I’d done many months before.
I was very stuck, it turns out. Stuck in my approach and method, stuck with advice from coaches I didn’t really click with, and stuck in a depression that was itself all about stickiness.
Two years later, in a new city that I loved, in a home I cared for, in a gym I liked – I’ve started making personal records again. First, a 105kg clean. Then a bodyweight snatch. Then a 97kg jerk.
The last one – the 97kg jerk – was only a little more than what I could do two years earlier. But it made plain what’d been different for me.
I was trying way too hard. I was using muscles to protect some part of me that had been hurt. And those same muscles did so much work that helped me, but prevented me from moving past the same weight. At a certain point, their activation worked against me, and prevented my progress.
Every day, if you confront the things you can’t do, you have two options: to notice what in you is trying harder than ever to do what you increasingly know it can’t, and to let go of it; or to keep letting it try, and watch what you want elude you.
You Should Go to Therapy

Maybe I’m your friend, and I sent you this link. Maybe you’re someone who doesn’t know me at all. Whoever you are, you should probably go to therapy.
Let’s say you are my friend. We were probably having a conversation in which it sounded like you were stuck on the exact same thing you’d been stuck on three times before. Was it that a person you’re dating just happens to bring out in you the exact same pattern of behaviour you find to be really troubling, and you’re just unsure of why you can’t leave the relationship?
Probably.
Again, I’m not sure who you are. But let’s imagine that yes, you’ve got some understanding that you’re doing something you feel helpless to stop. You might describe it as being stuck, or afflicted by weakness of the will, or who knows.
The answer to your dilemma is simple, but also really hard and weird. Here it is:
Go to therapy.
It’s that easy!
But it’s not easy to find a therapist that fits with you, nor to carve out the money to afford it. It’s not easy. But it’s the only thing that could help you break your impasse and understand why you’re stuck.
It’s not easy to go to a therapist, discover that it’s not a fit, and then go find another and start over again. But that’s what you’ve gotta do, because you keep demonstrating you’re not making progress on your own. The roots of your issue remain stuck deeply in the ground, and so you feel stuck, still.
It’s not easy to discover that CBT does nothing for you, and that the alternative that does seem to kinda work takes years. But that’s how it goes. Psychodynamic therapy and analysis works, if it works for you.
It’s also not easy to show up and make progress, when therapists don’t tell you to do much, and when it’s so fun to just get caught up in all your oldest, baddest patterns and dwell on the most superficial results of that work. But therapy’s the only place where you stand a chance at taking responsibility for your actions, your behaviour, your patterns, your life.
I don’t know why. But it’s how it is.
Thank you for reading this. I will never bring this up again to you. It’s on you to do something with it. It always has been.
Cybertruck to the Future
Courtesy of an internet friend, who made this with another friend while bored at work. You may need to click on this link and view it in Youtube if it doesn’t play.
Did you know those things are shipping sometime this year? Did you know I have been very tempted to pay the small deposit, hoping that I would somehow come into an outrageous amount of money that would allow me to justify buying one of these bad boys? I would love nothing more.
The Vancouver Sound

Sure, it may have been more or less constantly grey and soggy from November to April, but Vancouver really did have some stuff that was special. For me, during the three years I lived there, it was this hike up Cypress, and the electronic music scene. There’d be shows posted on the regular from Pacific Rhythm and Vancouver Arts and Leisure, and there were plenty of ways in if you wanted to play your own music, or just to dance.
Resident Advisor did a feature on the Vancouver sound, and they came up with this playlist to capture it. Florist by Marine Drive – track 3 – is especially dope to my ears. Press play, and reminisce with me:
The best part of this scene was that it didn’t close down at 11pm, like everything else in town. Parties would just keep going for as long as there were artists to perform. And artists were really performing. It was the first time I saw people use the tools that I decided I wanted to learn.
This was also a time in my life when I was zipping back and forth between the tech bubble of San Francisco every two weeks. That opened up this hilarious gulf in my life – between showily produced and curated and expensive San Franciscan experiences, and the fully DIY and self-perpetuating-against-all-odds vibe I got from going out to underground spots in Vancouver. At one show (I’m still not sure what to call these things), hosted in a gallery/studio in a Fairview back alley, we got “bottle service” for $25: a bottle of prosecco in a Home Depot bucket.
It was fucking great and humane, probably because it was, at its core, very, very queer. The few stable venues were in Vancouver’s gay village, on Davie.
Actually, at that Fairview show, we nearly didn’t get let in, because (a) we showed up at like 11pm and no one else was there yet, and (b) right as we rolled up, my bud decided to start talking the very specific talk that tech bro executives talk. Why? I don’t know. Maybe there’s something about walking up to an unmarked door in a back alley (they were always unmarked doors in back alleys) that makes us reach, and overreach, for ways to show we’re cool enough to be let in. I still remember them saying: “I think we get to decide if they can go in.”
We were let in, fortunately. The jams didn’t start for another hour.
None of these spots seemed to last more than a couple shows. Vancouver Arts and Leisure shut down, and was displaced by a condo. But the scene kept going.
I Wear a Uniform at Work
And So Can You

That was a pretty funny pic, I thought. And then I wore that vest – a lil Arcteryx prototype vest my aunt found at their Vancouver outlet and gave me for Christmas – everyday at work until I got too hot sometime in June.
Why? To remind myself that I was at work.
“That’s obvious, though! Why bother?” Unfortunately, while it may have been obvious that I was at work based on the beige and the cubicles, I had a lot harder time finding the distinction between what was and wasn’t work. At its core, this was a failure to distinguish what work could and couldn’t do for me: work could, I kept discovering, keep me diverted and engaged at its best. But it could not ever give meaning to my life.
Work, I kept having to remind myself, shouldn’t be everything. It shouldn’t be all-consuming. It shouldn’t be the thing at the core of my life that gives meaning to the rest of what I do. Because I’d lived that way for enough years and in enough failed ways to know that it is a lie. There is no life worth living for me where work is the principal thing, or even the third most important thing, in my life.
This last role I was in was very demanding: it felt a lot like being a startup founder again in terms of scope, but without any of the commensurate control and authority you enjoy. So that throwback to my startup founding days made it real easy to regress into an older way of being that really fucked me up, and translated into many small bad things, like spending too much time and emotional energy on work, even when I wasn’t there.
But once things got really bad at my job, it meant what little capacity I had for maintaining that distinction just completely fell apart. I leaned on every coping strategy I had until my finances and my inner life were a jumbled mess.
And then I got a uniform.
You wear the uniform at work, and take it off when you get home. And with it, you have a ritual for setting aside all of the demands work will place on you. Whether you concede to those demands even after you have removed your uniform is up to you, ultimately. But then the fact of your betrayal of your own self is a little plainer: here you are, in your own clothes and home, making the habitual out of the supererogatory, ignoring all the things inside you that you swear can wait just a little longer.
Sometimes, people will make fun of your uniform, which I think is great. A bud at work showed up wearing a black vest and looking stoic, and yep. That’s me. I have been read, and I have been placed. I am the guy with a uniform. I am doing exactly what I must, and then I am free.
A Christmastime Story About Automating Your Appointments
With Heroku, and Twilio, and Hope for the New Year
I’d been trying without much success to get an appointment to put on winter tires at my local Costco. If you get up early enough, you can go wait in line and they’ll do it for you, but who wants to get up at 6am? For that, I’ll wait until I’m a more elderly Costco patron, with fewer demands upon my time. Fortunately, Costco uses an online scheduling webapp to book appointments, whose API calls I could examine!
Thus began an exhaustive foray into discovering just how many appointment openings I could get notifications about, using Chrome dev tools, Heroku Scheduler, and extremely simple Python scripts.
Read moreAn Attempted Survey of All the Netflix Christmas Movies
I have been sick this whole week, so I watched all the Netflix Christmas movies. Just the Netflix Originals – meaning I didn’t get to watch Merry Kissmas, unfortunately. What follows are reviews of those movies, made while I was still sick.
Read moreConfidence
I used to think that confidence emerged from success. That if I pulled off enough, was rewarded and awarded enough, I would finally feel what I’d been missing in my life: a sense that I was enough. If I aimed high enough and got there, I’d find something up there that could give me the inner buoyancy that lets life seem easy, that could keep me afloat above all the things that dragged me down before.
In the course of pursuing that vision of confidence, I started a startup that failed, landed me in a tremendous amount of debt, and left me a little stumped. I had lots to show for it – shit, I did learn how to code after all – but I’d ultimately failed to do the biggest, scariest, hairiest thing I aspired to. After a couple years of tentatively pursuing more startup-shaped things, I decided to drop pretty much all of it. Something didn’t seem right about this path, or about the way I was trying to find my path.
Read moreThe view from the long tail
Part of the allure of blogs – for those who still write them – is that it’s a thing you work at over time, and gradually there’s this accretion of work and content and meaning that has a heft. It’s the accumulation that leads, for once, to something that feels more like an asset than debt, and it’s meant to lead somewhere really special and powerful and possibly to the best book deal a fashion blogger in Minnesota could hope for.
Read moreShoutout to the guys at my old coworking space
shoutout to the guy at my old coworking space who tripled his team size with one weird trick: hiring a bunch of beautiful, 20-year-old women as unpaid marketing interns.
shoutout to the two other guys who saw these women come in for work, and who immediately posted ads for marketing interns.
shoutout to the guy at my old coworking space who stole my lunch.
Read moreThe Dream of the Nineties
Salivating at the last decade of easy living
In reading Amanda Palmer’s The Art of Asking, I was struck by a tiny detail about her time in Boston as a statue artist that made me feel a deep sense of despair familiar to many millennials.
It’s simple, really. It’s that she worked as a statue artist and was able to pay her bills. Y’know those ones who wear makeup, dress like the Statue of Liberty or the like, and stand stock still? Occasionally, she’d have a shift or two at a coffee shop, and she lived in a communal house, but still. She paid her own way to live in Boston by busking as a statue artist.
I’ve busked. A lot. I make $100 on a good day, and at least $50 on a bad one. But as best I could figure, if I went full-time on busking, I’d be able to make about $1500 a month. That would pay for my rent and my car insurance and a box of atulfo mangos; nothing more. My rent is very, very reasonable for a 1-bedroom in Vancouver. Maybe I could find a roommate situation and also be able to afford many more groceries?
Read moreLean Art
Making a Minimum Viable Expression
I’ve spent the last couple years struggling with whether or not I should be building startups. I was pretty deep in that community, and even though I think I won’t try to start one again, a few really helpful principles from that world still rattle around in my head, and affect the things I build as an artist.
Read moreJourneying
In search of transformative value
I realized the other day that people don’t often undertake quests anymore. The hobbits holding the One Ring had to go on a quest to drop it in a volcano; modern problems, by contrast, don’t seem to have singular solutions that would make questing useful.
And then I found this helpful piece of thought on the topic:
* A Quest is trip to accomplish a Task.
* An Adventure is a trip without a destination.
* A Journey is when the trip is more important than the destination.
Backflipping my way out of depression
Here’s a trick that may work for you too if you’re depressed, but which you should try even if you’re just moderately-to-seriously stuck.
It’s a trick I learned on vacation after an especially tumultuous period in my life, after I’d already changed a bunch of things I thought were actually responsible for my depression, when I realized that I still wasn’t getting much better. It’s merely a trick for when things should be moving but aren’t, and not a substitute for medication (if you need it) and therapy (which we all need).
I learned how to backflip.
Read moreWelcome to my Cool Web Site
Recapturing the web of my adolescence
Welcome to my blog. In the year 2018, it’s rumoured that blogs will matter even less than they do already. The truth is — they don’t matter to me a whole lot right now. I’ve been writing on Medium for the last long while. It’s just easier to rack up views there, and though I kept paying Digital Ocean $10 a month to host a Ghost blog, it really only acted as a place where I could put writing samples and anti-startup jeremiads (which I’d keep in my drafts, tbh).
Read more